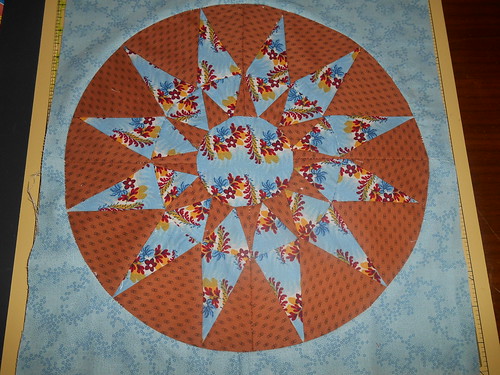
This is the last block in this 19th century sampler quilt. The block is the Rising Sun from the period just before the Civil War. It was one of the few block patterns that had a name during that period. I have included two very good videos that gives a hands on directions to techniques that were used to make this block. Come join us below the orange squiggle and see how easy this block is to make.
DK Quilt Guild: A place for quilters to gather, share ideas, projects, and to make the world a better place, one quilt at a time. Join us and share your thoughts, projects, questions, and tips. Quilters here are at many different levels of skill. Beginners and non-quilters are welcome, too!
I looked for a long time for this pattern on the internet but could not find a free pattern for it. I was also having a hard time locating a pattern for it in my collection that was not a large size block. I did find a 13 inch block pattern for the rising sun. I had to redraft it to fit in a 12 inch finished square. I then printed it out on artist tracing paper so I could paper piece it. It is an easy design to paper piece.
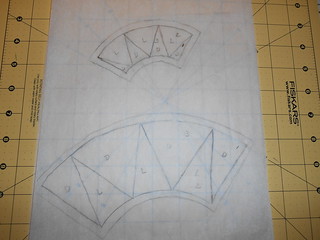
This video will explain how I made these paper pieced pattern.
I finished my 8 sections that needed to be paper pieced.
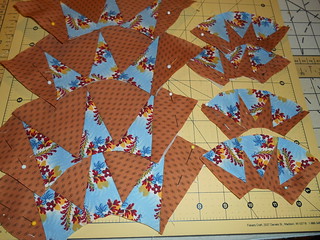
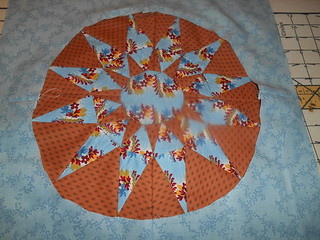
This is how they are assembled. I had to hand baste them first because of how stiff the pieces are with paper in them. I needed the lines to follow the curve so I did not pull the paper out until after they were assembled. Also hand basting allows me more control over how the points are worked in. I didn't have the time to fiddle with all the diamonds so they were perfect. I rather liked the rustic look of the piece and some of that will quilt out and not be noticed.
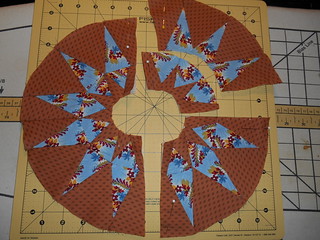
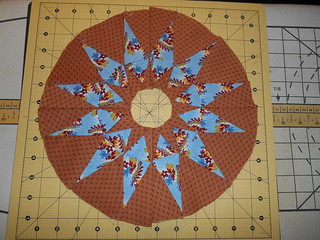
It was time to make the center. I used a round small bowl that was the right size to draft the circle. The paper was pulled off of the back of the center sections before I started. I left the paper on the outer sections so I would have a line to follow later. Then I pinned it in the center to applique. I turned under the edges as I pinned. I will make sure my points are nice and pointy and the circle will not be perfectly round but close. If I did it a perfect circle some of my points would be cut off or not touching the center which is more noticeable then a slightly wonky circle.
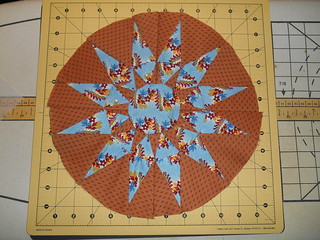
This is how I stitched my circle down by hand. This video shows how to needle turn applique.
I am all finished with the center.
I used a round 10 inch plate to make my next pattern piece. I traced the curve on a corner of a piece of paper leaving plenty of space for squaring up the block. I also used one of the sections as a guide for the size. Remember in the 1840's women used what ever they had to help make a curved pattern. They figured it out even with out being able to read or write. A string and a couple of pins could make an arch. You could even score the paper with the pin if you didn't want to attempt it with a pen.
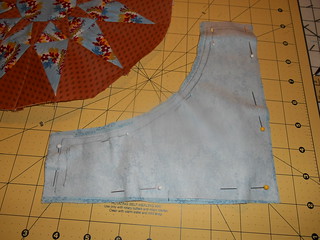
I sewed the 4 sections together and checked to make sure the circle was the right size to fit around the block. It was a little too big so I took a bigger seam to correct that. Sorry about the smug on the lens but I did want to show that all you do is lay it down over your block. You will be able to tell because you need the circle to be smaller then where the points end.
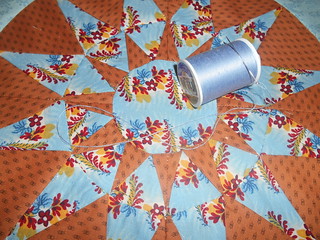
I sewed the curve by basting it first. You don't have to baste but I like to have all my points sharp and this way works well for me. I don't have all those pins to worry with as I sew. I just follow my thread line. I pulled the rest of the paper off after I was done. Steamed pressed it and squared it up to 12 1/2 inches.
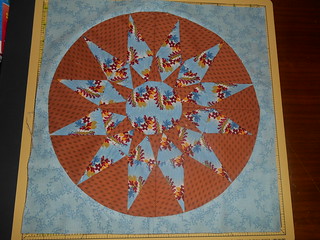
This is the last block for this quilt. There is a total of 30 blocks in all. Next time I will show how to add the sashing to each block and how to layer the backing and batting to each block. This quilt is going to be quilted in sections and bound together. It is a very easy way to quilt a large quilt. When I am done the quilt will also be very pretty on the back.
~~~~~~~~~~~~~~~~~~~~~~~~~~~~~~~~~~~~~~~~~~~~~~~~~~~~~
After doing quite well with scheduling for awhile, there are now lots of open dates. Would you like to write a future DK Quilt Guild diary? Please join in! Please volunteer within the comments. Thanks
The schedule:
DKQG Diary Schedule
08/03 -- OPEN
08/10 -- trkingmomoe~Sampler Quilt Along
08/17 -- winifred3
08/24 -- trkingmomoe~Sampler Quilt Along
08/31 -- OPEN
09/07 -- OPEN
09/14 -- OPEN
09/21 -- OPEN
09/28 -- OPEN
