Good afternoon, everyone. Sorry I'm a little late — I was experimenting with Da Boys video camera, trying to get some footage to illustrate some of what I'm writing about tonight but alas, my progress was painfully slow, and I was only able to get one small bit done.
So… you'll have to make do with my written explanations.
I'm going to talk about a couple of knitting tricks; the first will help keeping track of the center of a knit piece much easier; the second has to do with various ways of accomplishing a left-slant (usually illustrated on a pattern as \ or as ).
As to the first: over the years I've often come across references to "weaving" a contrasting-color thread through stitches as you knit, to mark the center point, the end, or the beginning of a pattern, but never found instructions on exactly how one was supposed to do that. One long thread, horizontally? Several threads, vertically?
So, I experimented. And the only way that makes sense to me is to do it vertically. However, I've also found that using a thread is not as quick as transferring a marker from needle to needle — so I only use it when I need to keep track of the center stitch of a pattern.
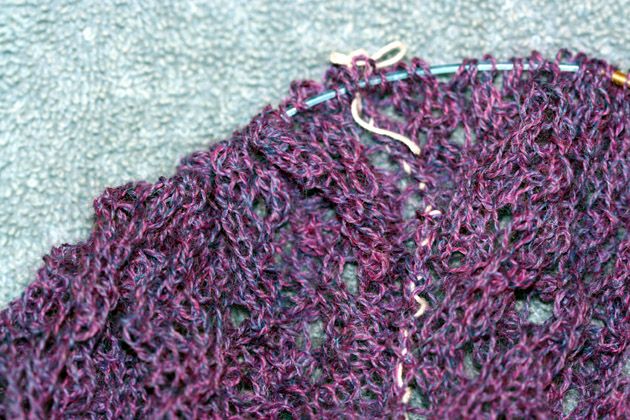
In the shawl I'm currently knitting, I need to know where the center of the entire shawl is, and where the center is on each half of the shawl — so I'm using blue crochet thread to mark the middle of each side, and white for the middle of the shawl
Cut a good, long piece — 8 inches or more. Fold it in the middle, and when you come to the center stitch, as you knit the stitch, knit the loop of thread with it. Repeat on alternate rounds, picking up a fresh loop of thread. As you move up, the thread will extend down, marking the center — and you'll always know which stitch it is.
Because the thread isn't attached to the side, when you've used up the top length, you can just pull it up to give you enough length at the top to continue. The marker looks like this:
Next, a couple of tricks on the left-slanted decrease. The three ways to do a left-slant increase are: slip one, knit one, pass slipped stitch over (s1k1psso); slip two stitches separately as if to knit, insert left needle into the front of the two slipped stitches on the right needle, and knit together (ssk); and knit two together through the back of the loops (k2tb).
S1k1psso is the least desirable of the decreases, for 2 reasons: it's cumbersome and takes too many motions, and because it doesn't visually match the usual right-slanted decrease, knit 2 together. When you pass the slipped stitch over, it shows, whereas when you knit 2 together, the stitches nestle against each other. And sometimes, it matters. Years ago I knit a sweater that had a huge amount of shaping around the hips. The sweater was knit in stockinette stitch, so it was obvious that, with the pattern as written, the decreases were done differently. I ended up starting over because it was that glaring — and now I only use S1k1psso when I knitting with such small thread and needles it's the safest was to avoid a dropped stitch.
Ssk avoids the visual disturbance of s1k1psso, but it's also slow and cumbersome. Think of all the motions — slip, slip, place left needle in stitches, and then, finally, complete the stitch. When knitting lace, where you have scores of decreases across lengthy rows, all those extra motions cost you a lot of time which can be completely avoided.
Instead, I use k2tb — one quick, easy motion which perfectly mirrors a knit 2 together. If you have a little trouble getting your right needle through the back of the stitches, insert the needle in the front as if to purl, then just slide the needle under to the back.
Sorry I don't have videos — if anyone wants me to, I'll finish editing what I recorded and post it next week.
