"Give me yesterday's Bread, this Day's Flesh, and last Year's Cyder." --Benjamin Franklin, Poor Richard's Almanac
Disclosure: I am a registered nurse by training and an information technology geek by experience. I am not a food historian, professional chef or baker, or an authority on anything in particular. This diary is a product of my personal experience and research as an amateur enthusiast.
Bread is one of the oldest prepared foods. Our ancestors in the Neolithic Era likely figured out how to produce various forms of unleavened breads from ground or sprouted grain. The type of grain used was dependent on where the erstwhile baker was. Wheat, the oldest domesticated grain, is native to the Fertile Crescent and is thought to have been domesticated from chance mutations of the ancestral plant by at least 9000 BCE and possibly earlier.
Because of the presence in wheat (and rye and barley) of a protein composite called gluten, which has elastic properties, the naturally occurring yeasts in these grains feed on the sugars and starches producing carbon dioxide that is trapped in the dough formed from ground grain and water. This trapped gas leavens, or raises the dough lightening the texture (or crumb as the non-crust part of bread is called) and adding complex flavors that many people find appealing.
The subject of bread is vast. There are myriad types and forms. As ubiquitous as bread is in almost all cultures, the thought of baking a loaf strikes fear in the heart of amateur bakers. Why? The simplicity of the basic recipe—flour, water, salt, yeast—draws you in. Who doesn't love the smell of baking bread and the taste of a freshly baked loaf topped with your favorite butter, jam, cheese, etc? The novice without preparation, or guidance from an experienced baker, soon gets lost in the technique of kneading, rising, punching down, shaping the loaf. The first loaf fails to rise, rises to much, collapses in the oven, has the density of a brick, and is generally inedible. Discouragement sets in and perhaps the would-be baker never attempts to make bread again. After all, it is readily available at a relatively reasonable cost everywhere.
Does this sound like you? Well, it was me at one point. My first attempts at bread were failures. My stubborn refusal to be defeated and my successes in other culinary adventures kept me searching for the right recipe, the right equipment, that moment of Zen that would deliver a perfect, beautiful, tasty loaf to impress my friends and family. Well, it isn't that hard really. You just have to keep trying and learning—in baking bread practice indeed makes perfect.
There are many, many books and resources for the aspiring baker. Here is a summary of useful books, tools and stuff-learned-the-hard-way that I have found over the last 30 plus years of baking:
Bread Alone by Daniel Leader and Judith Blahnik—An inspiring book with tons of practical history, information, sources, and recipes. I use Daniel's recipes almost exclusively and will share one that use all the time with you below.
Oxo Electronic Scale: I weigh my ingredients. It's not essential, but it is better. Many recipes for baking specify ingredients by weight and give the approximate equivalent in volume. Yes, it's completely geeky. I can't help myself. This scale isn't too expensive and it has nice features. For small amounts like ½ teaspoon, etc, I just use the measure as opposed to the weight. If you are using volume measures, use the "dip and sweep" method.
Kitchen Aid Stand Mixer: a complete luxury item, but I love it. It makes kneading the dough oh so easy. Kneading dough (a messy process) for 15 to 17 minutes can be pretty hard work. Bakers all over the world do it either out of necessity or because they think it is better. The mixer was a gift. I may be a geek, but I am also a tightwad. This is a pricey piece of equipment.
Bob's Red Mill: flours, yeast, specialty products like Bulgur Wheat, Semolina Flour, etc. There are lots of good, organic, natural products out there. I like Bob's Red Mill because they are readily available, reasonably priced, and the company is owned by the employees as explained in this diary. That matters to me.
Stoneware baking sheets: mine came from The Pampered Chef because my daughter had a "party". But these are better
20% Bran Flour: this is a blend of unbleached, white bread flour (look for hard red spring wheat as the ingredient) and stone ground whole wheat flour that gives a nice balance between whole grain and light texture. Mix the unbleached, white bread flour 3:1 with the whole wheat. Three pounds white to 1 pound whole wheat fits in a 1 gallon ziplock bag or a gallon jar if you prefer.
Baker's Peel: this is the big boat paddle looking thing you see your local pizzeria using to put pies in the oven. If you are going to bake bread very often you will appreciate having this. You can get one at your local restaurant supply house for $20 (at least in Oklahoma City).
Coarse-Grain Wheat Bread (makes 1 ten-inch round loaf, can be doubled)
This is my go-to recipe. It is about 50% whole wheat, a nice balance of heartiness and light texture. It uses the common bread making technique of a poolish, or a pre-fermented, loose dough made of equal parts of flour and water (by weight) and a little yeast. The poolish gives a better flavor and texture to the crumb than so-called straight dough recipes that mix all the ingredients at once, rise twice, and then bake. Warning: this method takes time. You can make the poolish at night before you go to bed and finish the recipe in the morning or just accept that it will be literally an all-day process, though your time actually working the bread and baking is at most a couple of hours.
Make the Poolish
Spring water or filtered water (Chlorine kills microorganisms, yeast is a microorganism) 3 fl oz. (6 tablespoons, 85 mL)
Active dry yeast (NOT rapid rise) ¼ teaspoon
20% bran flour blend 2 oz (about 1/3 cup plus 1 tablespoon, 57 grams)
Whole Wheat flour 1 oz (¼ cup, 28 grams)
In a medium bowl, to the room temperature water add the yeast, stir and allow to stand for a minute. Add the flours and stir until it is like a thick batter. Stir about 100 strokes or 2-4 minutes until threads form when you lift the wooden spoon from the batter (OK, it doesn't have to be wood. Bakers like wood because all the little yeasties live and breed there forever and inoculate future doughs because you would NEVER put your wooden spoon in a dishwasher. . .would you?). This is the sign of developing gluten. Cover the bowl with a piece of plastic wrap or a damp towel and place in a slightly warm (70-80 degrees Fahrenheit) place for at least 2 hours. Overnight or 8-10 hours is better.
The Bread
From here the recipe assume you are using a stand mixer. If you have one, you already know how to use it (or should). If you don't have one and you know how to bake bread you don't knead me (get it, knead/need? Ha ha) to tell you how to do this manually. If you are completely new to baking you might want to do a little more research and reading before trying this. I highly recommend the Bread Alone book linked above. Or, you can try <this>
Spring or filtered water 9 fl oz (1 cup plus 2 tablespoons, 266 mL)
Active dry yeast ¼ tsp
Whole Wheat flour 4 oz. (1 ¼ cups plus 2 tablespoons, 113 grams)
Sea salt 1 ½ teaspoons
Cracked Wheat (Bulgur Wheat) 1 oz (2 tablespoons, 28 grams)
Cracked Rye (hard to find, you can just use the same amount of additional Bulgur Wheat) ¾ oz (2 tablespoons, 21 grams)
20% bran flour blend 9-11 oz (2 cups minus 2 tablespoons – 2 ½ cups minus 2 tablespoons, 255-311 grams)
Into your mixer's bowl scrape the poolish. Add the water and yeast. Stir with a wooden spoon to break up the poolish until it foams a bit. Add the Whole Wheat flour and mix well. Add the salt and half of the cracked grain. Mount the dough hook in your mixer and crank it up to "2" or just above the lowest setting. Begin adding the 20% bran flour blend until the dough reaches a soft, not-really-sticky-anymore consistency. It should not stick to the side of the bowl and the bowl will be fairly clean and free of flour and dough. Like this:
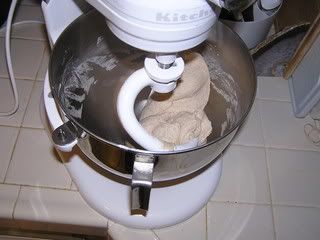
Knead for 15—17 minutes. Turn off the mixer. The dough should come free from the hook easily. Shape the dough into a ball and rest it on a lightly floured surface while you oil the mixing bowl (solid shortening is best, but oil will do). Place the ball into the bowl and turn it once to coat the surface. Cover with the plastic wrap or a damp towel and let rise in that warm, draft-free place until doubled in volume (2-3 hours depending on the temperature and the mood of the yeast).
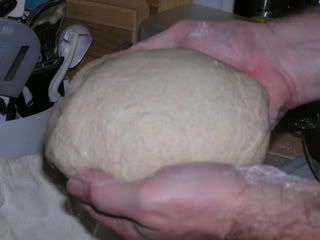
Once the dough has raised, punch it down or deflate it by pushing your fist or hand into the center (a little flour on your hand works wonders). Put the dough on a lightly floured surface (counter top is the natural choice) and knead lightly for a minute or so. Shape the dough into a tight ball about the size of a softball by tucking your hands slightly and folding the dough underneath to meet in the center. Toss the remaining Cracked Wheat and/or Rye onto the surface and roll the ball in the grain . You will likely have to press the grain into the ball a little. Just do the best you can, it doesn't stick very well.
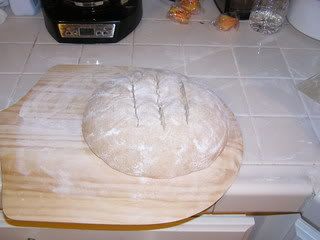
Shaping the Loaf:
I like to proof (the final raising) directly onto a baker's peel. Cover with the plastic wrap or damp towel and let rise until one and a half to twice its size. About an hour before you think the dough will be ready, preheat your oven to 450 degrees Fahrenheit (232 degrees Celsius).
Use a razor-sharp knife or razor blade to score the loaf about ½ inch (1 cm). A gentle touch is required, hence the razor sharpness. You can skip this step, it just looks cool when the bread is done.
Here's how I set up my stoneware baking equipment. The bottom and top pieces fit together to form a little miniature "brick oven" that makes the crust divine.
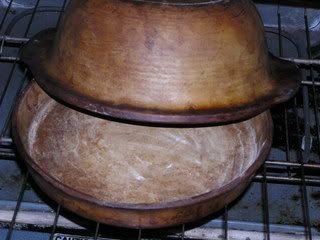
You can mimic the results with a flat stone and a clean sprayer bottle filled with water. If you don't have either, use a cookie or baking sheet. Gently slide the loaf onto the stoneware or baking sheet. Replace the top, or if you are using just the bottom stone of baking sheet now is the time to spray water all over the surface of your hot oven (avoid the light bulb) to create steam. Don't be stingy with the water if you are using it. Spray for about 15 seconds. Close the door. If you use the water method, spray again in about three minutes.
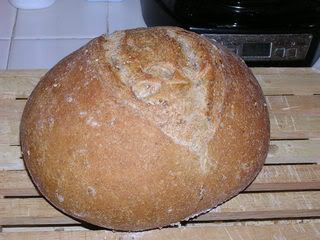
After 20 minutes, reduce the oven temperature to 400 degrees Fahrenheit (204 Celsius). Bake for 20 minutes longer. Check the loaf. Gently tap it, if it sounds hollow it's done. Remove to wire cooling rack (mine is actually wood). Be patient and let it cool for at least 20 minutes, it will help the flavors diffuse and the loaf finish baking internally. Here's what it looks like:
In keeping with the the Daily Kos tradition here is my family's most requested pie recipe:
Buttermilk Pie
1 ready made, rolled up pie crust made by the Doughboy. I know, I know how can a guy that makes bread use a pre-fab pie crust. Because they're easy and pretty good. And I like my pie easy.
1 stick softened butter
2 cups sugar
3 Tablespoons all-purpose flour
3 eggs, beaten
1 cup buttermilk
1 ½ teaspoons vanilla extract
Dash of nutmeg
Preheat oven to 350 degrees Fahrenheit (177 degrees Celsius). Prepare the pie crust in a 9 inch pie pan. A little trick to keep pie crusts from getting soggy on the bottom: crack one of your eggs into the crust and tilt from side to side like you're panning for gold to coat the crust with egg white then dump into the mixing bowl. Cream butter and sugar together until light and fluffy. Add remaining ingredients. Sprinkle a little nutmeg on top. And put into oven on the middle rack. Bake for 45—50 minutes. Eat.
